Welcome back readers!
In the writing moment I have passed 100 working hours at the Sars center and I am thrilled to learn and do more lab work!
In this period there is two main tasks I have been working with in the lab.
The first is called midi preps. This is a method where we use different buffer solutions to do a plasmid DNA purification of the bacteria E. coli. These plasmids contain a specific coding amino acid sequence which we later want to be expressed in our Ciona larvae. That means if we want to interrupt or look closer at specific activity related to the development of the larvae nervous system, specific gen expressions are needed to affect the development.
So short about going from a functional growing bacterium with our modified plasmid to pure plasmid DNA. First the culture medium with the bacteria were transferred into plastic containers to be centrifuged, so the bacteria’s bundles together into a soft mass.

Bacteria culture in medium (upper right corner), Centrifuge machine (down in the right corner) and our bacteria culture in medium after centrifuging (to the left). Photo: Eilen Knutsen Ravnanger
Then the more fancy and patient part 😛 After centrifuging, the liquid was removed from the plastic containers leaving only the soft mass of bacteria`s. Further to access the plasmid, we dissolved the bacteria into a RES buffer containing RNase A (resuspension buffer). These two were mixed until there were no more lumps in the solution, which makes it easier for the bacteria to lysis in the next step.
MAGIC TIME! When adding the next buffer, LYS buffer (Lysis buffer), the bacteria will start to break down and the plasmids will float free in the solution. After 5 minutes I could play magician. By adding the NEU buffer (Neutralization buffer) the bacteria`s lysis reaction stops, which causes the liquid in the plastic container to go from a strong blue color to a colorless solution. Have a look!

<– In the two pictures to the left, you can see the set up with the column filter which holds back the destroyed bacteria. To the right you can see Mari (my lovely lab partner) working with pipetting EQU buffer into the column filters to wash the solution! Photo: Eilen Knutsen Ravnanger
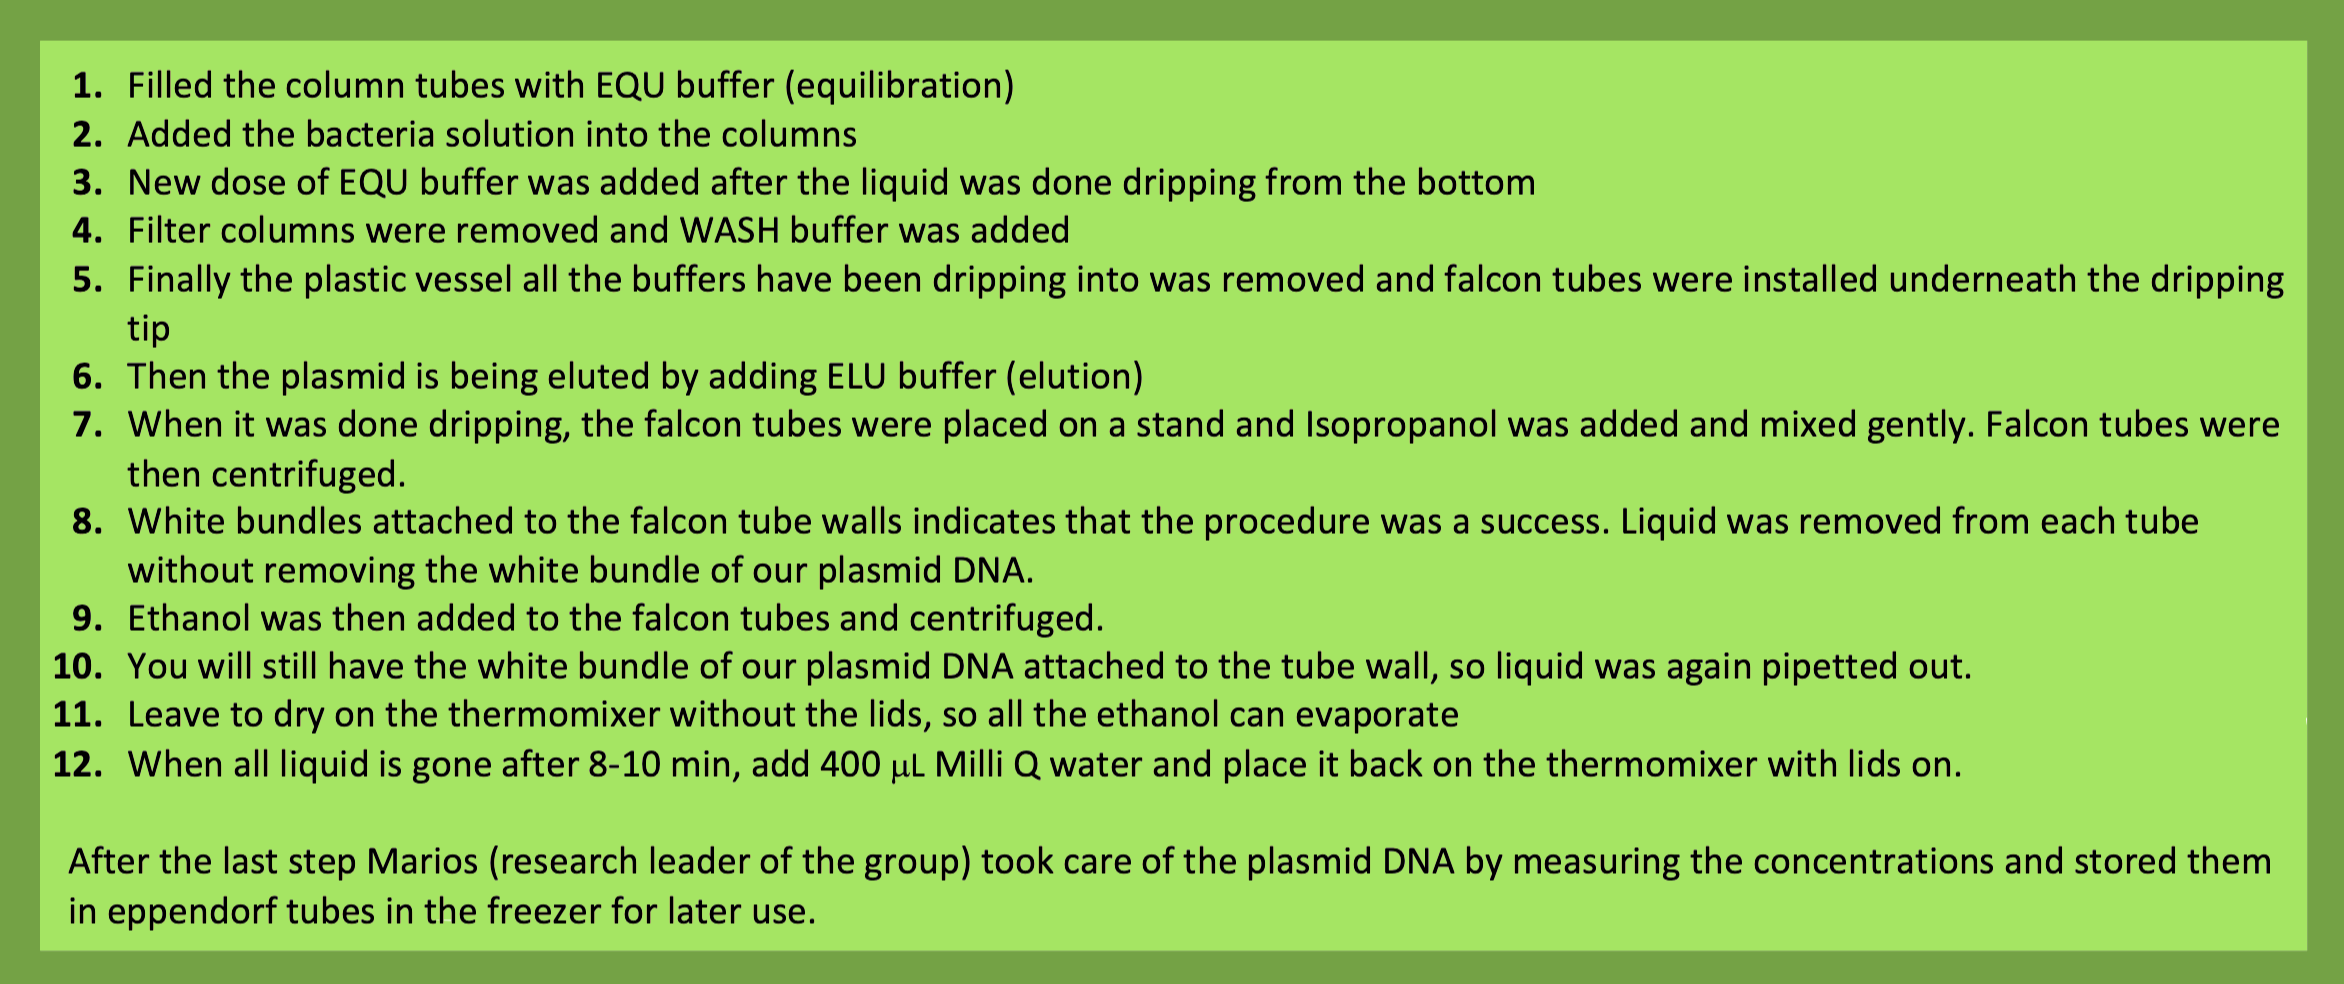
Fact box explaining step by step what is done with the filter columns –>
Now for the electroporation part <3 This is a process were we by using an electroporation machine postpones fertilized Ciona egg cells to an electrical field which will make pores in the membrane so our plasmid DNA can enter the cell. By doing this we can insert our wished plasmid DNA into the egg cell, so the developing Ciona expresses the genes we inserted earlier in the plasmids of the E. coli.
So how is this done exactly?
Let’s have a look!
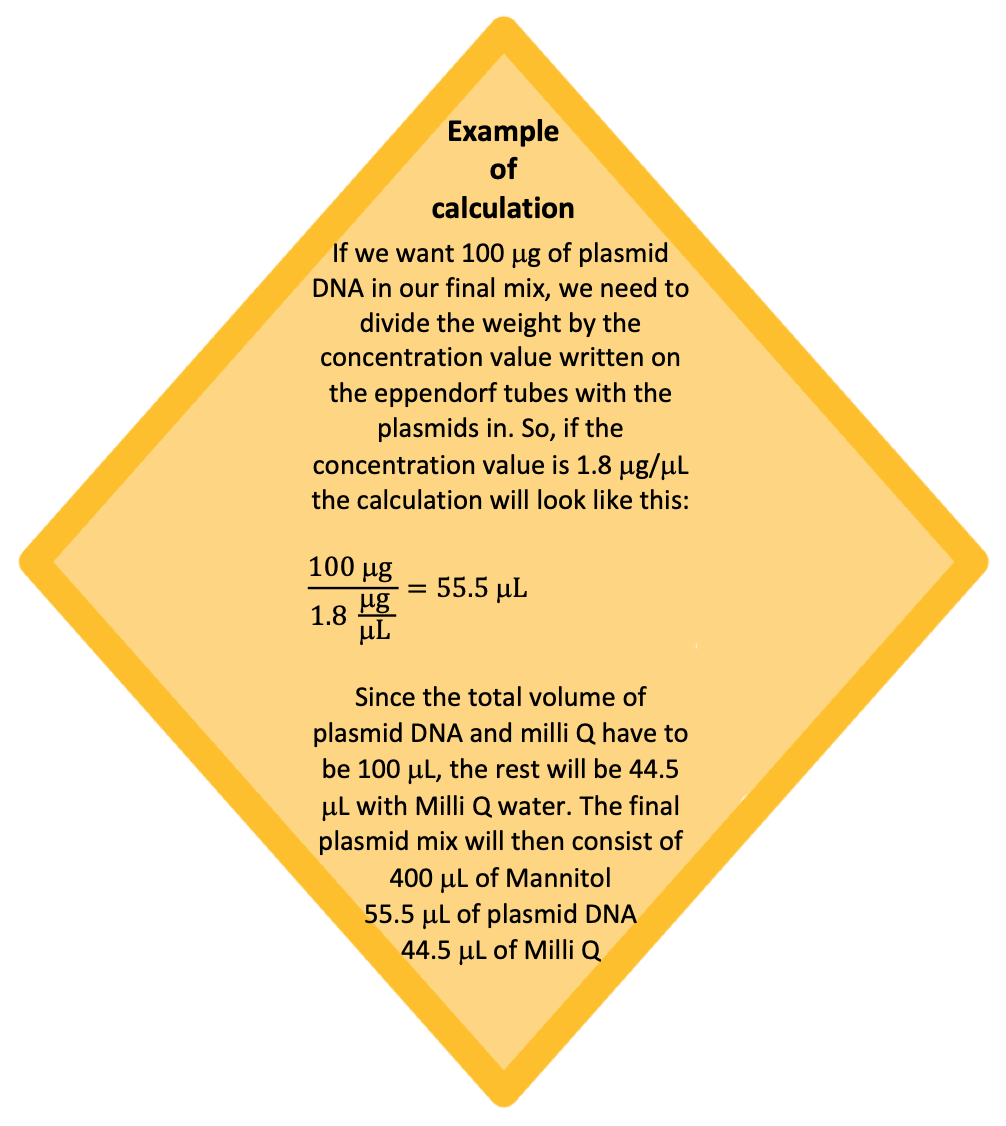
When midi preps had been done, Marios (our “mad scientist” in charge <3) measured the concentration of the plasmid DNA and stored it in the freezer, ready to be used in electroporation. Preparation time! First, we needed to get ready the plasmid mix which contains the chosen plasmid DNA we want to insert in the fertilized egg cells, milli Q water (basically very sterilized water so it doesn`t affect our experiments) and a liquid called Mannitol (C6H14O6). So now our chemistry and math acknowledgments come in handy. Our total mix consists of 400 micro-liters Mannitol and 100 micro-liters of plasmid DNA + Milli Q water, which gives us a total of 500 micro-liters. So, details about the calculations for how much plasmid DNA we needed in the mix + the amount of water, see the fact box below.
Further we prepped the setup we needed to have ready for the electroporation part later. This set up looks like this and was stored in an incubator at 14 oC:
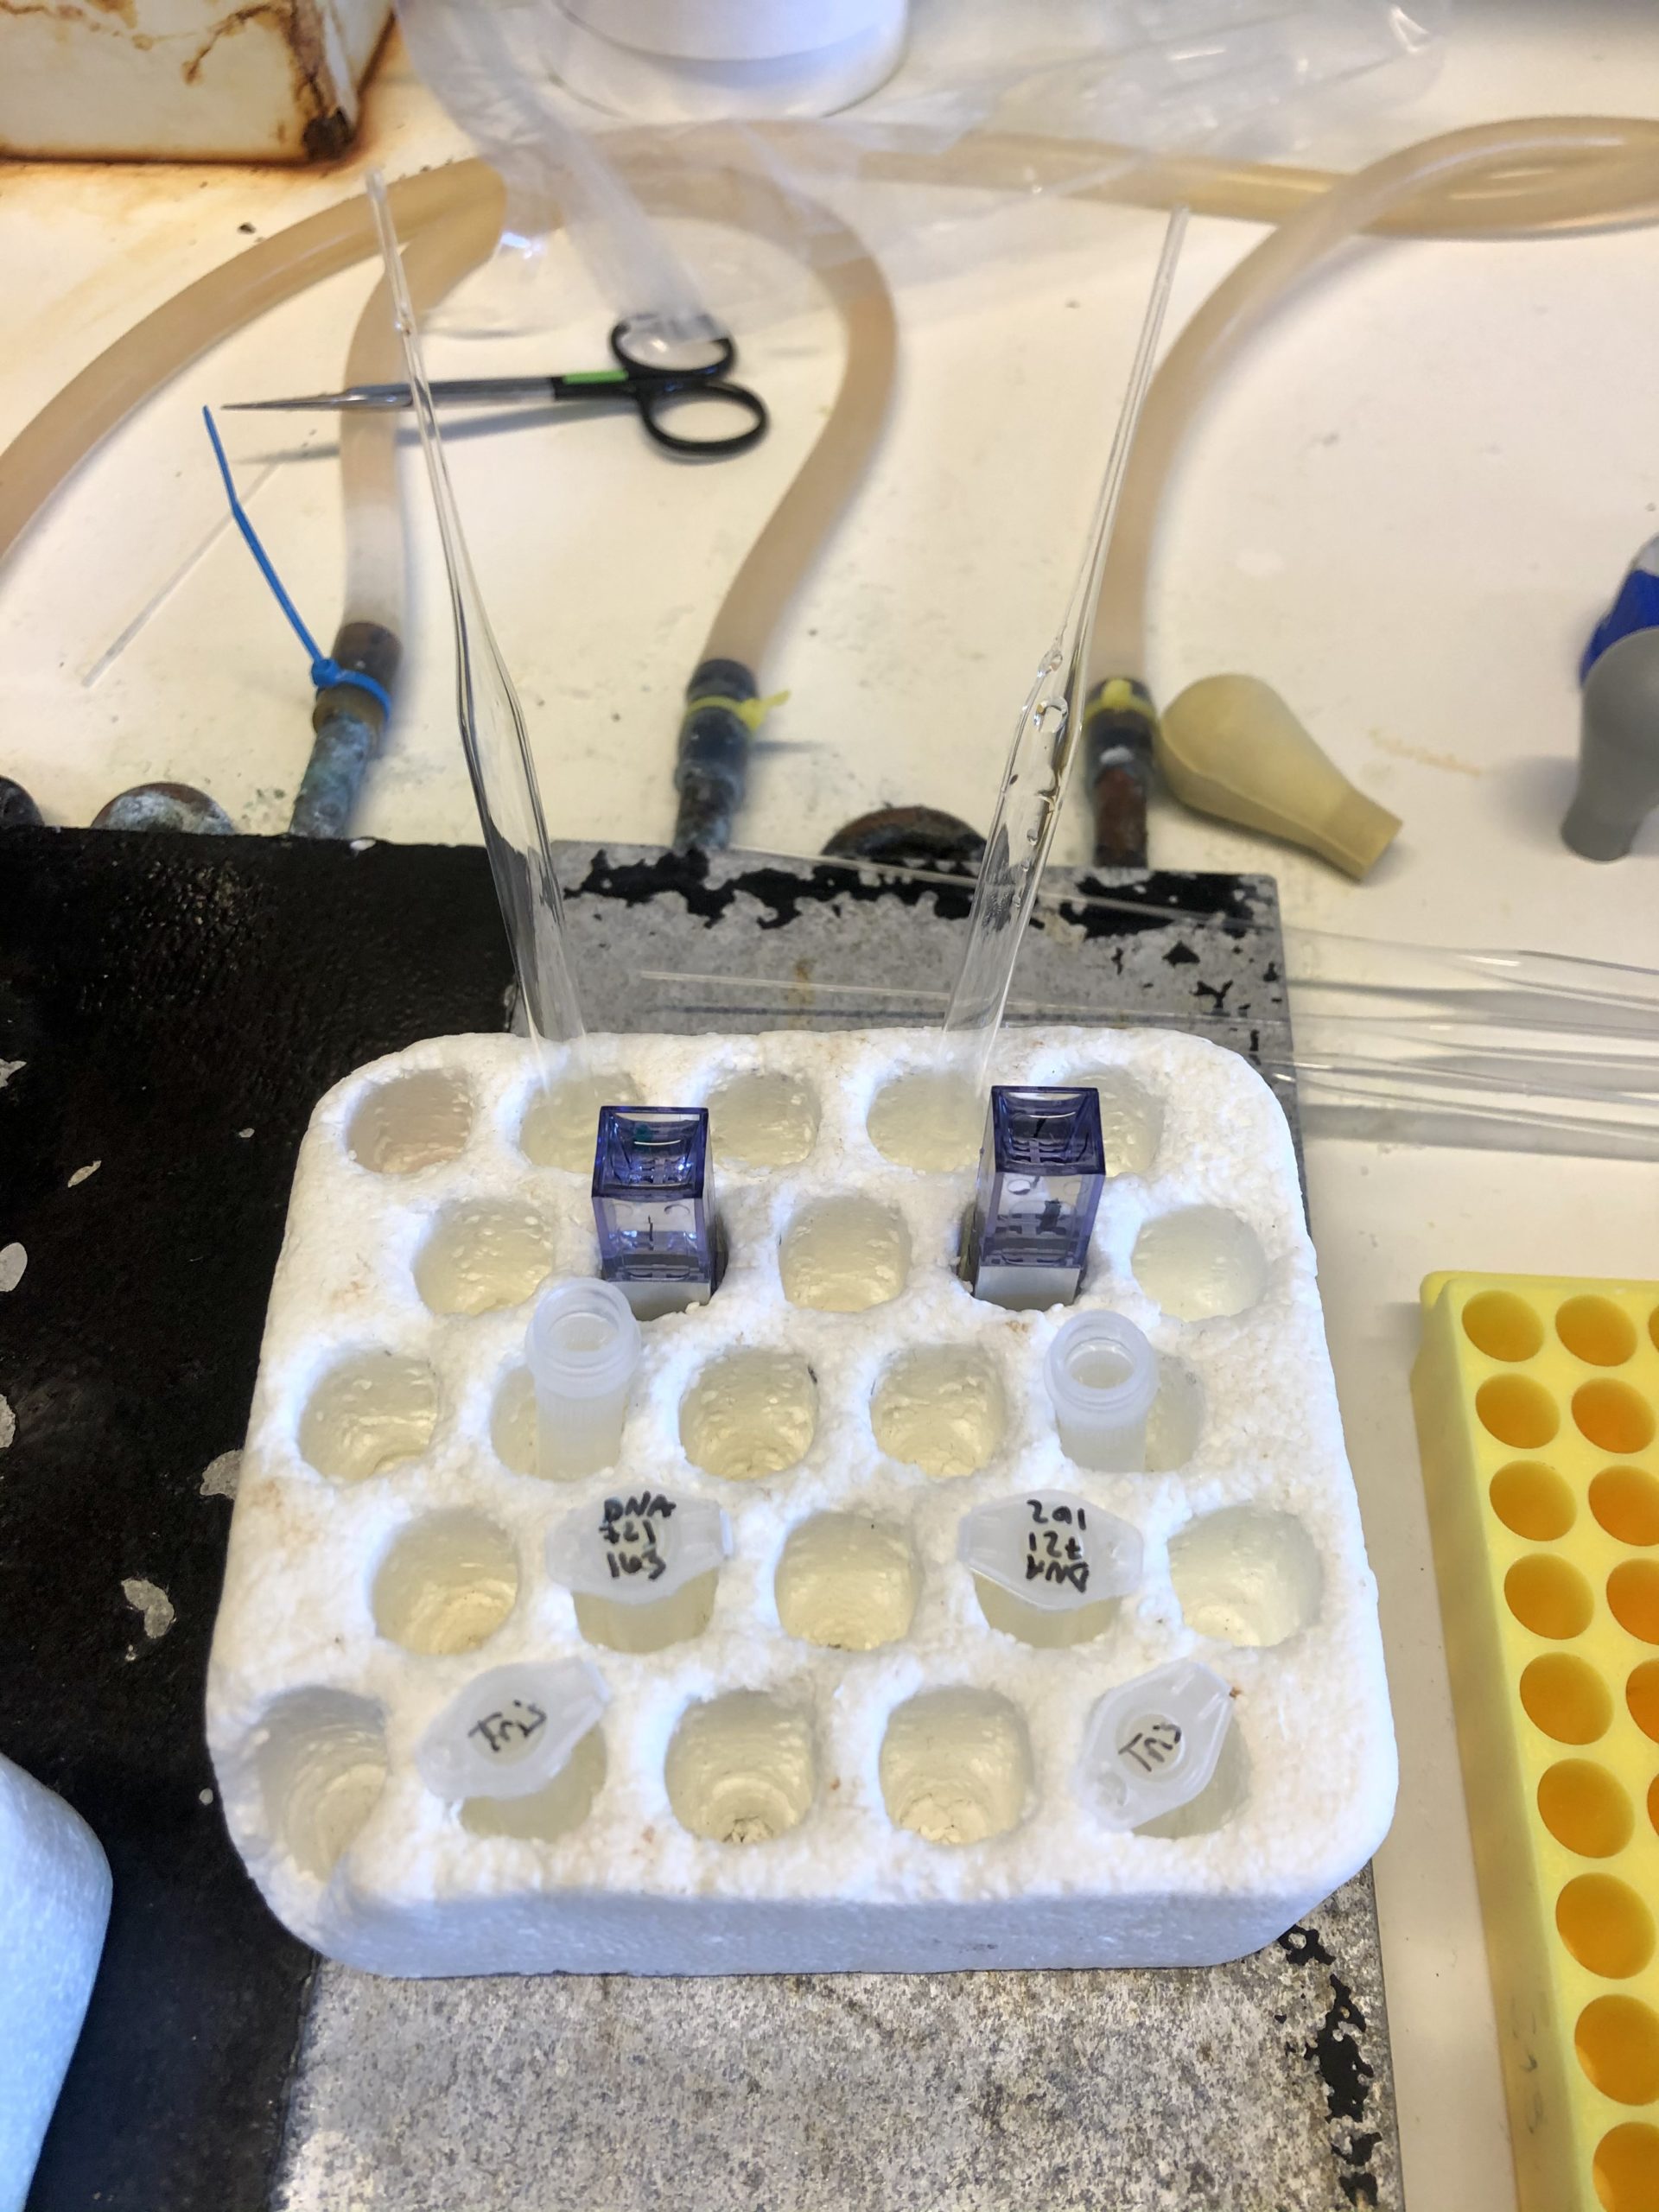
Set up for our electroporation. From the top – glass pipettes, cuvettes filled with auto chlorinated sea water (ASW), tubes filled with ASW, our eppendorf tubes with plasmid mix and eppendorf tubes with Tris. Photo: Eilen Knutsen Ravnanger
Here we have from the top – glass pipettes, cuvettes filled with auto chlorinated sea water (ASW), tubes filled with ASW, our eppendorf tubes with plasmid mix and eppendorf tubes with Tris (this will be used later to activate the sperm cells).
Further we could start the preparations for the extraction of egg cells and sperm cells from the Cionas collected at Bildøy. Two 15 mL falcon tubes were prepped, one filled with ASW (container for the collected eggs) and one containing a sodium mix (Sodium Thiaglucolate + 10 drops of 1M NaOH). They were placed under cold running water in the sink to keep the mixtures and the environment as cold as possible, since the Cionas prefers that 😀
In the next step we sadly had to commit murder of some of the collected Cionas. With help of a scissor, we cut from the posterior end of the animal by cutting from the lower tube on the animal (atrial siphon) to the bottom of the animal. By cutting through layers and layers of soft, slippery and jelly layers the inside looked like this (picture below to the left):

The red like colored tube in the middle of the animal is the egg cells enclosed in a thin membrane (picture in the lower right corner). By removing the eggs first, we could extract the sperm cell, which is placed underneath the eggs in a separated enclosed thin membrane. Observe my deep concentration while removing the sperm cells in the other two photos. Photo: Eilen Knutsen Ravnanger and Mari Munkeby.

In the two pictures to the left, you can see the egg cells before they were added to the sodium mix with their cilia proteins covered around. The two pictures to the right show the egg cells after being in the sodium mix for 8 min and rinsed. Photo: Eilen Knutsen Ravnanger
When the collection was done, the collected egg cells were placed into the falcon tube with the sodium mix and placed for 8 min on a stirring plate. This process removed the outer proteins on the egg cells (looks like cilia’s) so it will be easier to make the egg cells more permeability for injection of plasmid DNA later during the electroporation.
After rinsing the egg cells by remove the sodium mix with ASW, we activated the sperm cells by adding 16 microliters of the sperm into the eppendorf tube with Tris, added ASW up to the 1 mL mark on the tube and mixed it well. After mixing the eppendorf tube, we added 60 microliters of the activated sperm cells into the petri dish with rinsed egg cells.
Fertilization in progress! Now we needed to work fast, but not hurry if you know what I mean. By observing the eggs, we wait for the eggs to start spinning! That means the egg cells have been fertilized! Really fascinating to look at! Don`t mind the weird sound at the end 😛 Have no idea where that came from 😛
After letting the egg cells being fertilized there were new rounds of rinsing to remove the remaining sperm cells.
Now for the electroporation part!
Now we transferred the egg cells over to the tubes which is prepped and ready in the incubator, added the plasmid mix into the fertilized eggs in the tube and mixed it in with a glass pipette. Last step is to transfer the eggs into the prepped cuvette and run it through the electroporation machine!
Yes, it was a lot of steps, many things to get acquainted with, but when you have done it a couple of times it sticks to your brain! Just like learning to ride a bike. When you first can do it, there is no problem doing it!
The egg`s in the cuvette is after electroporating transferred into big petri dishes, rinsed for exploded eggs and placed into the incubator for further growing and development! Colorful and fascinated pictures of the developed larvae come in my last blog post!
Teaser! There will be pictures of fully grown larvae`s with fully developed nervous system and some who has not!
I hope it wasn`t to “dry” following me through typical days at the lab!
For the last 50 hours at Sars I will continue doing midi preps and electroporation’s. Maybe something new?
So, for now, take care and I`ll see you around for my last blogpost <3
– Eilen
«We sadly had to commit murder» First time I’m hearing that turn of phrase